> ## Documentation Index
> Fetch the complete documentation index at: https://docs.lyzr.ai/llms.txt
> Use this file to discover all available pages before exploring further.
# Agent Simulation and Hardening
The Lyzr Agent Simulation Engine is a powerful environment used to rigorously test your **"Compliance Advisor Bot"** against diverse scenarios and personas. This process validates the agent's performance, pinpoints failures, and automatically hardens its behavior against those failures.
## 1. Accessing the Simulation Engine and Setting up the Environment
### Step 1.1: Select the Target Agent
1. **Access:** From the main Lyzr Studio dashboard, navigate to the **Agent Simulation Engine** section.
2. **Quick Start:** Review the four main steps: **1. Select an agent**, **2. Create an environment**, **3. Add personas and scenarios**, and **4. Run evaluations** to harden the agent.
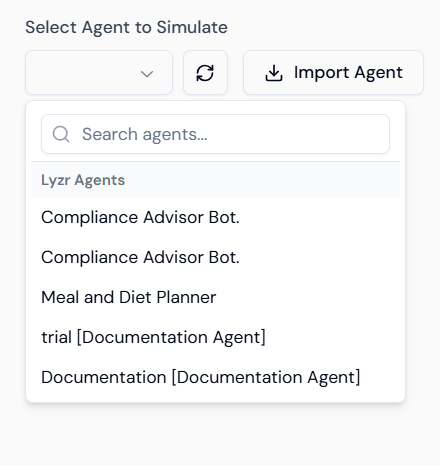
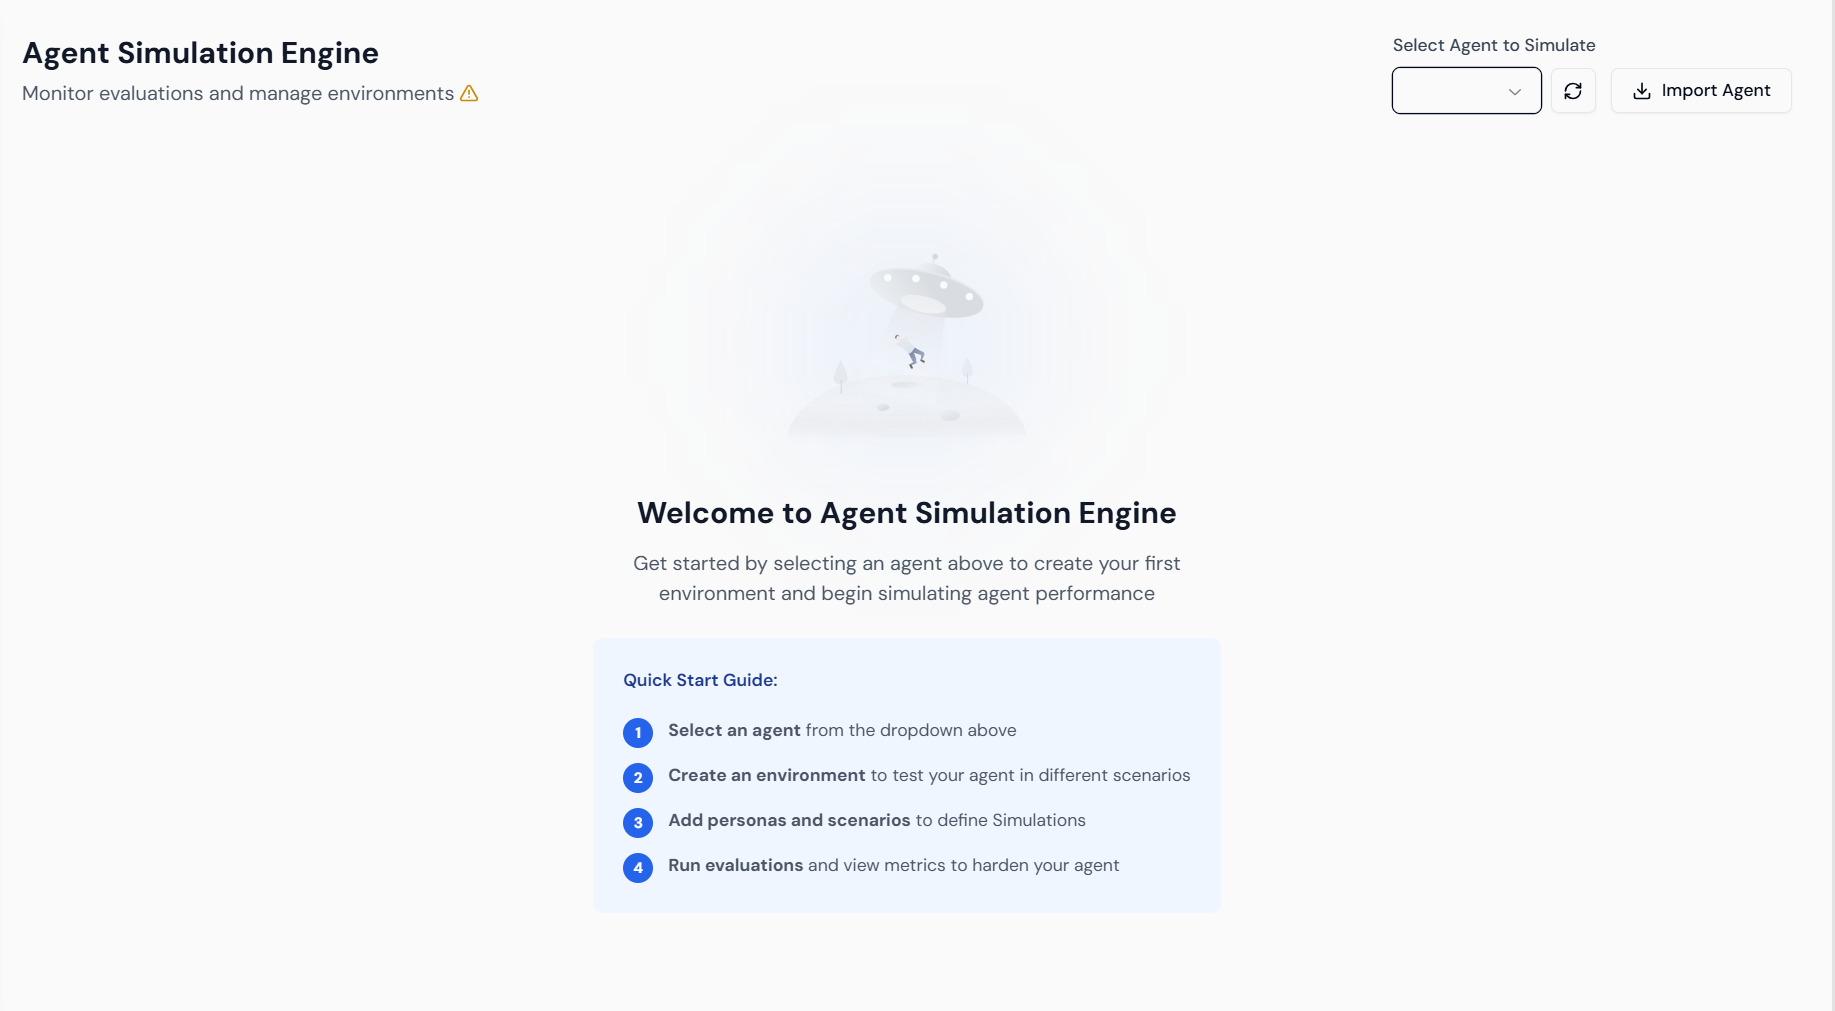 3. **Selection:** Locate the "Select Agent to Simulate" dropdown menu.
4. **Choose Agent:** Select the built agent, **"Compliance Advisor Bot."**
3. **Selection:** Locate the "Select Agent to Simulate" dropdown menu.
4. **Choose Agent:** Select the built agent, **"Compliance Advisor Bot."**
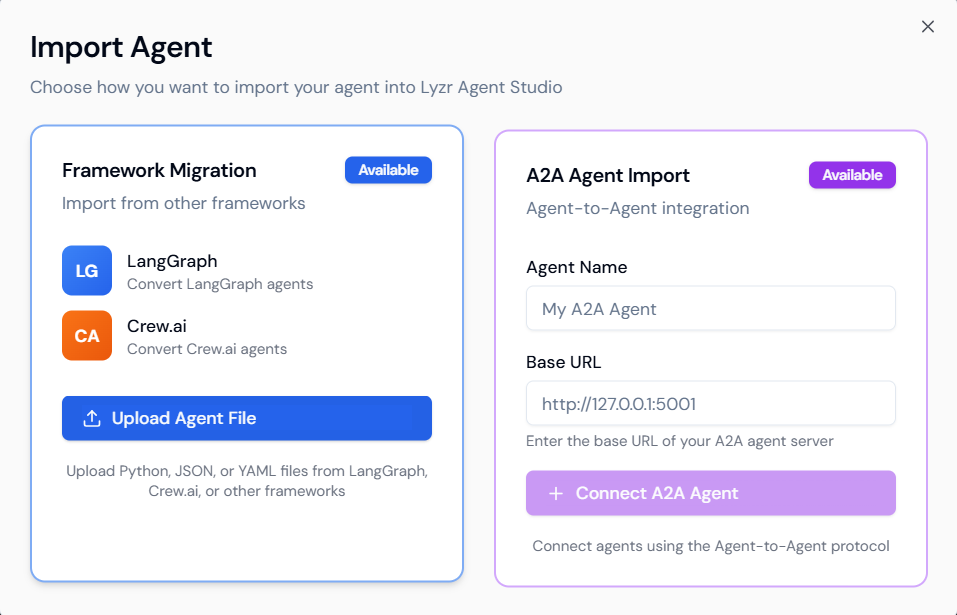
 5. **Import (Optional):** If needed, use the **Import Agent** feature to migrate agents from external frameworks like LangGraph (LG) or Crew\.ai (CA) using the **Framework Migration** option.
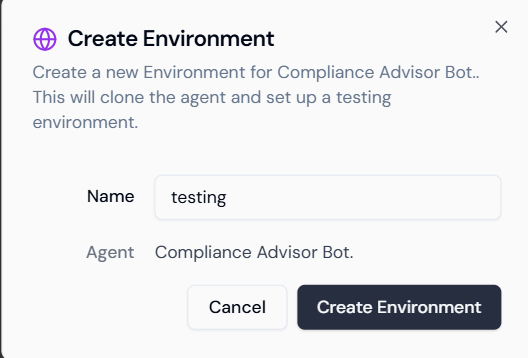
 ### Step 1.2: Create the Testing Environment
A testing environment is a dedicated clone of your agent for safe evaluation.
1. **Initiate:** After selecting the agent, provide a name for your testing environment.
2. **Name:** Enter a descriptive name, such as `testing`.
3. **Confirm:** Verify the **Agent** name (`Compliance Advisor Bot.`).
4. **Launch:** Click **Create Environment**.
### Step 1.2: Create the Testing Environment
A testing environment is a dedicated clone of your agent for safe evaluation.
1. **Initiate:** After selecting the agent, provide a name for your testing environment.
2. **Name:** Enter a descriptive name, such as `testing`.
3. **Confirm:** Verify the **Agent** name (`Compliance Advisor Bot.`).
4. **Launch:** Click **Create Environment**.
 ## 2. Configuring Simulations and Test Cases
This involves defining the "World Model" using Scenarios (the context of the query) and Personas (the user profile).
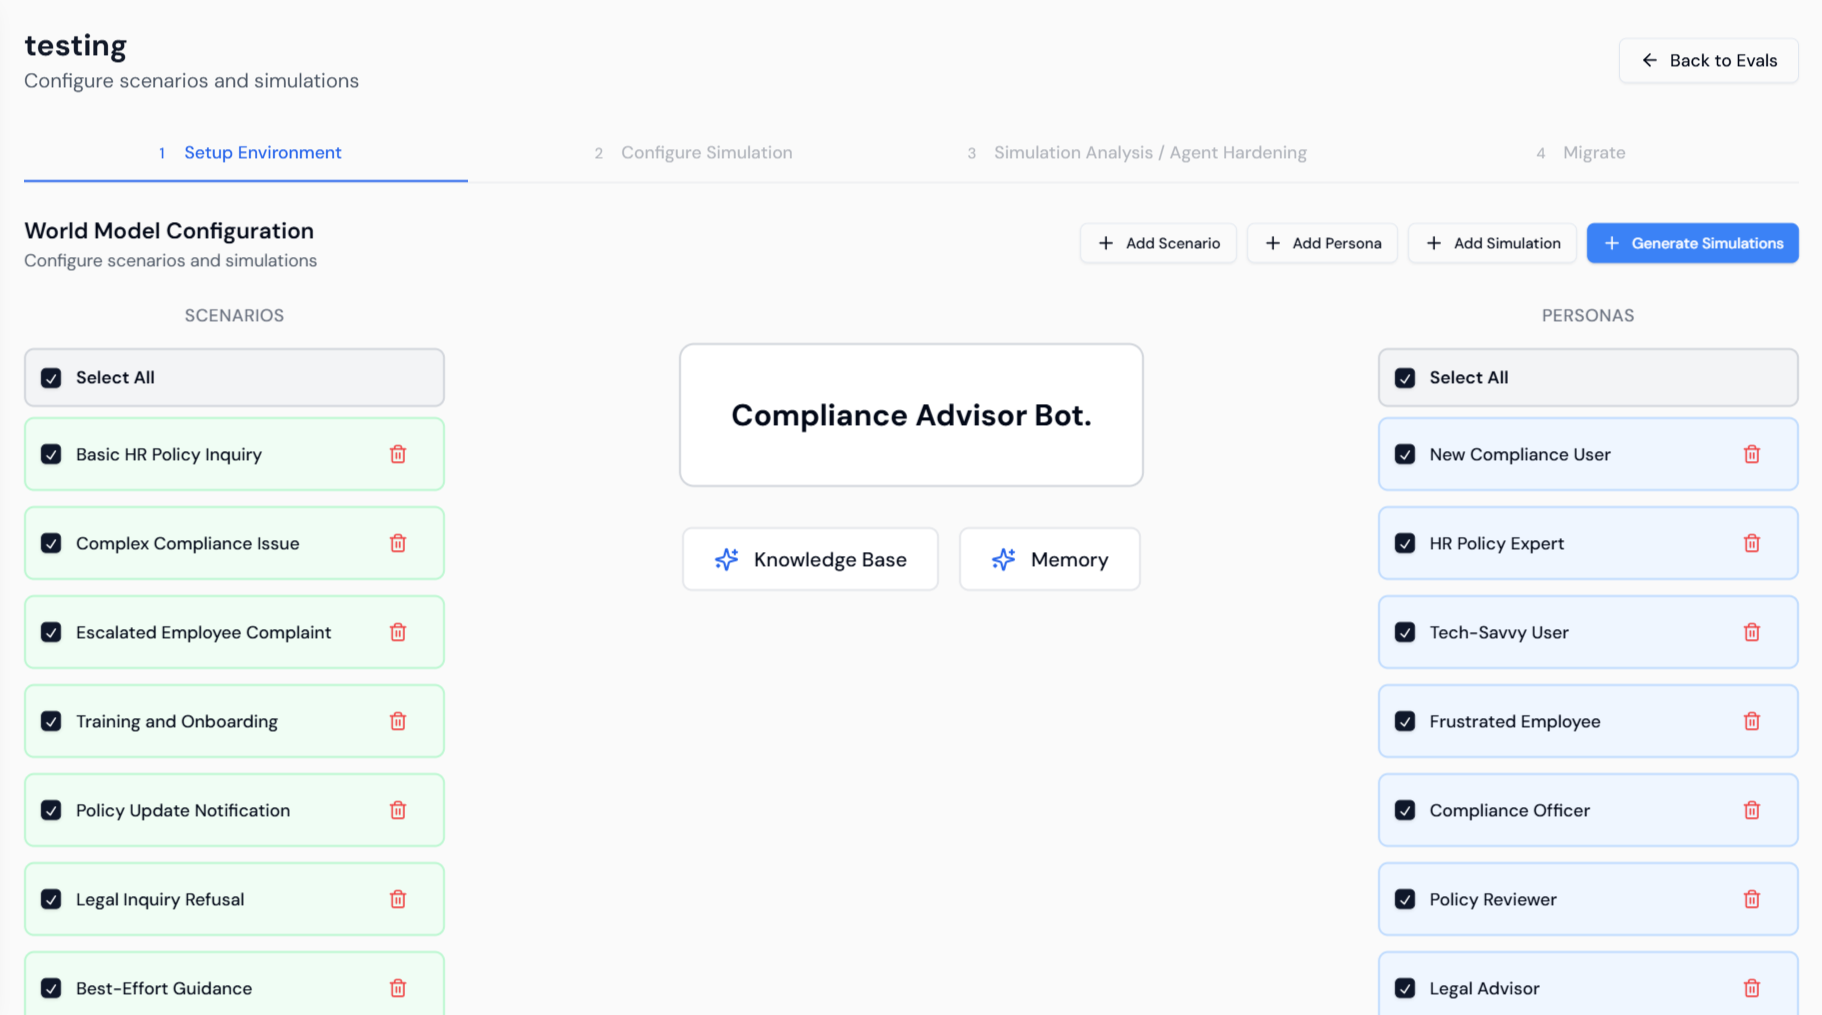
### Step 2.1: Select Scenarios and Personas
1. **Setup View:** The environment opens to the **Setup Environment** tab. Confirm the agent's core features (**Knowledge Base** and **Memory**) are active.
2. **Select Scenarios:** Choose relevant **SCENARIOS** on the left panel (e.g., **Basic HR Policy Inquiry**, **Complex Compliance Issue**, **Legal Inquiry Refusal**).
3. **Select Personas:** Choose representative **PERSONAS** on the right (e.g., **New Compliance User**, **HR Policy Expert**, **Legal Advisor**).
## 2. Configuring Simulations and Test Cases
This involves defining the "World Model" using Scenarios (the context of the query) and Personas (the user profile).
### Step 2.1: Select Scenarios and Personas
1. **Setup View:** The environment opens to the **Setup Environment** tab. Confirm the agent's core features (**Knowledge Base** and **Memory**) are active.
2. **Select Scenarios:** Choose relevant **SCENARIOS** on the left panel (e.g., **Basic HR Policy Inquiry**, **Complex Compliance Issue**, **Legal Inquiry Refusal**).
3. **Select Personas:** Choose representative **PERSONAS** on the right (e.g., **New Compliance User**, **HR Policy Expert**, **Legal Advisor**).
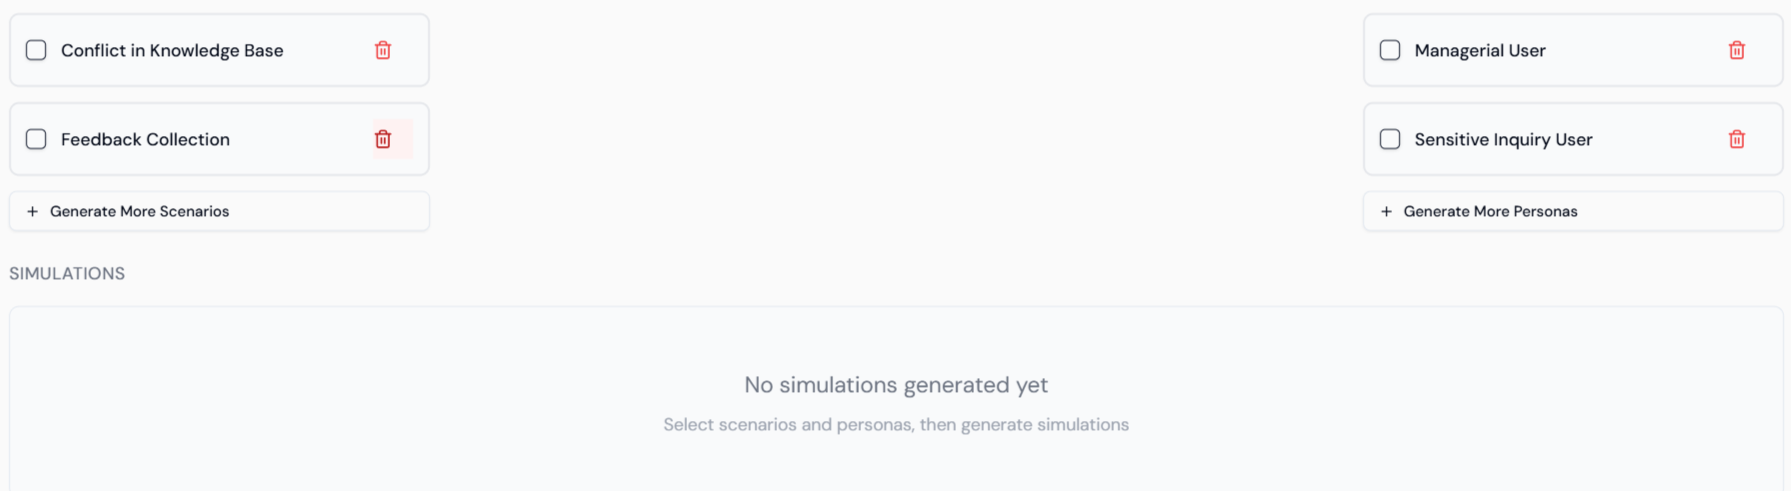
 4. **Simulations Panel:** The bottom panel shows additional scenario types (e.g., **Conflict in Knowledge Base**) and personas (e.g., **Sensitive Inquiry User**).
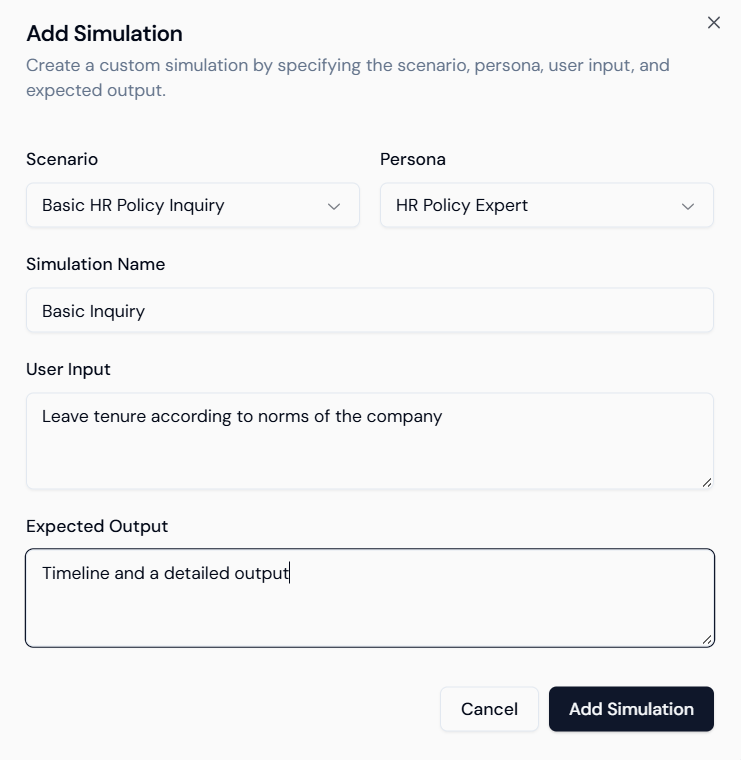
 ### Step 2.2: Add Custom Simulations
You can define specific test cases manually to address known vulnerabilities.
1. **Add Simulation:** Click **+ Add Simulation** at the top.
2. **Define Case:** Specify the **Scenario** (e.g., *Basic HR Policy Inquiry*) and **Persona** (e.g., *HR Policy Expert*).
3. **User Input:** Enter the specific query (e.g., `Leave tenure according to norms of the company`).
4. **Expected Output:** Define the ideal response (e.g., `Timeline and a detailed output`).
5. **Save:** Click **Add Simulation**.
### Step 2.2: Add Custom Simulations
You can define specific test cases manually to address known vulnerabilities.
1. **Add Simulation:** Click **+ Add Simulation** at the top.
2. **Define Case:** Specify the **Scenario** (e.g., *Basic HR Policy Inquiry*) and **Persona** (e.g., *HR Policy Expert*).
3. **User Input:** Enter the specific query (e.g., `Leave tenure according to norms of the company`).
4. **Expected Output:** Define the ideal response (e.g., `Timeline and a detailed output`).
5. **Save:** Click **Add Simulation**.
 ### Step 2.3: Review and Configure Evaluation
1. **Review Simulations:** The custom simulation appears in the list. Select it using the checkbox.
2. **Evaluation:** Click **Configure Evaluation** (1 selected) to select the metrics.
### Step 2.3: Review and Configure Evaluation
1. **Review Simulations:** The custom simulation appears in the list. Select it using the checkbox.
2. **Evaluation:** Click **Configure Evaluation** (1 selected) to select the metrics.
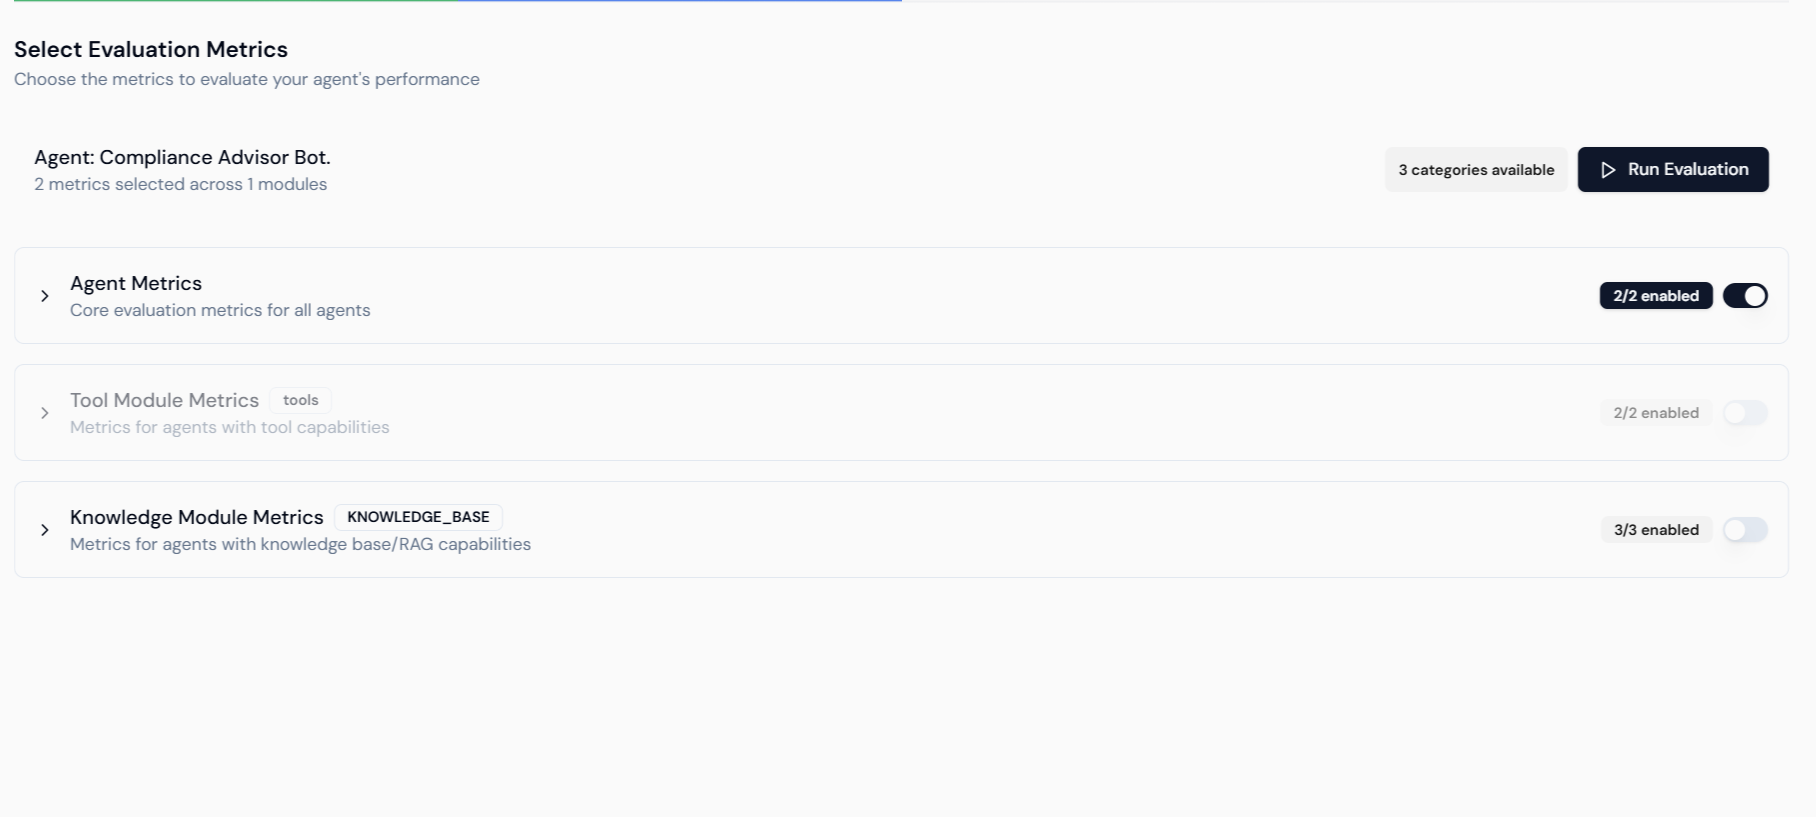
 3. **Select Metrics:** On the **Select Evaluation Metrics** screen, ensure relevant metrics are enabled:
* **Agent Metrics:** Core evaluation metrics.
* **Knowledge Module Metrics (RAG):** Essential for a compliance agent; ensure these are enabled for accuracy and groundedness checks.
4. **Run Evaluation:** Click **Run Evaluation**.
3. **Select Metrics:** On the **Select Evaluation Metrics** screen, ensure relevant metrics are enabled:
* **Agent Metrics:** Core evaluation metrics.
* **Knowledge Module Metrics (RAG):** Essential for a compliance agent; ensure these are enabled for accuracy and groundedness checks.
4. **Run Evaluation:** Click **Run Evaluation**.
 ## 3. Simulation Analysis and Automated Hardening
This phase diagnoses failures and applies fixes to the agent's instructions.
### Step 3.1: Analyze Simulation Results
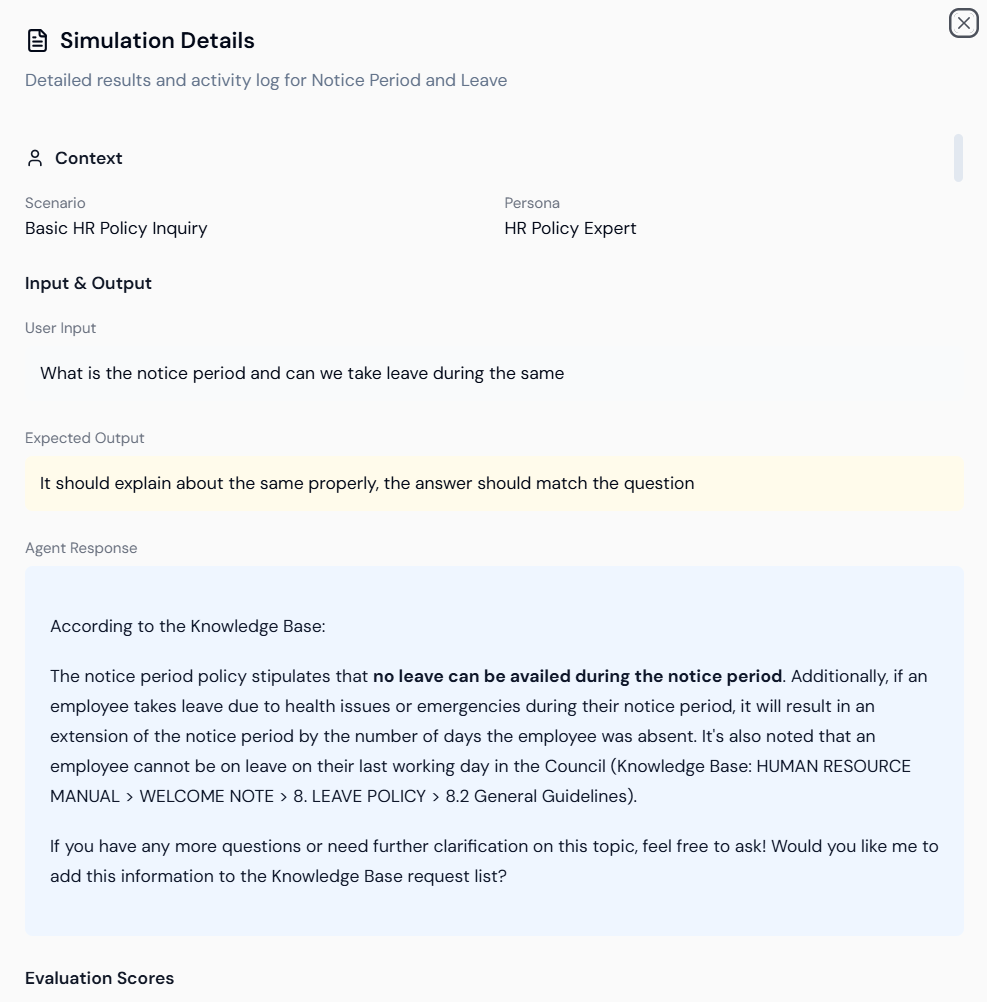
1. **Simulation Details:** After running, review the **Simulation Details** for the test case (e.g., *Notice Period and Leave*). This shows the **Scenario**, **Persona**, **User Input**, and the **Agent Response**.
2. **Agent Response Example:** The agent's response is provided, often citing the Knowledge Base source.
## 3. Simulation Analysis and Automated Hardening
This phase diagnoses failures and applies fixes to the agent's instructions.
### Step 3.1: Analyze Simulation Results
1. **Simulation Details:** After running, review the **Simulation Details** for the test case (e.g., *Notice Period and Leave*). This shows the **Scenario**, **Persona**, **User Input**, and the **Agent Response**.
2. **Agent Response Example:** The agent's response is provided, often citing the Knowledge Base source.
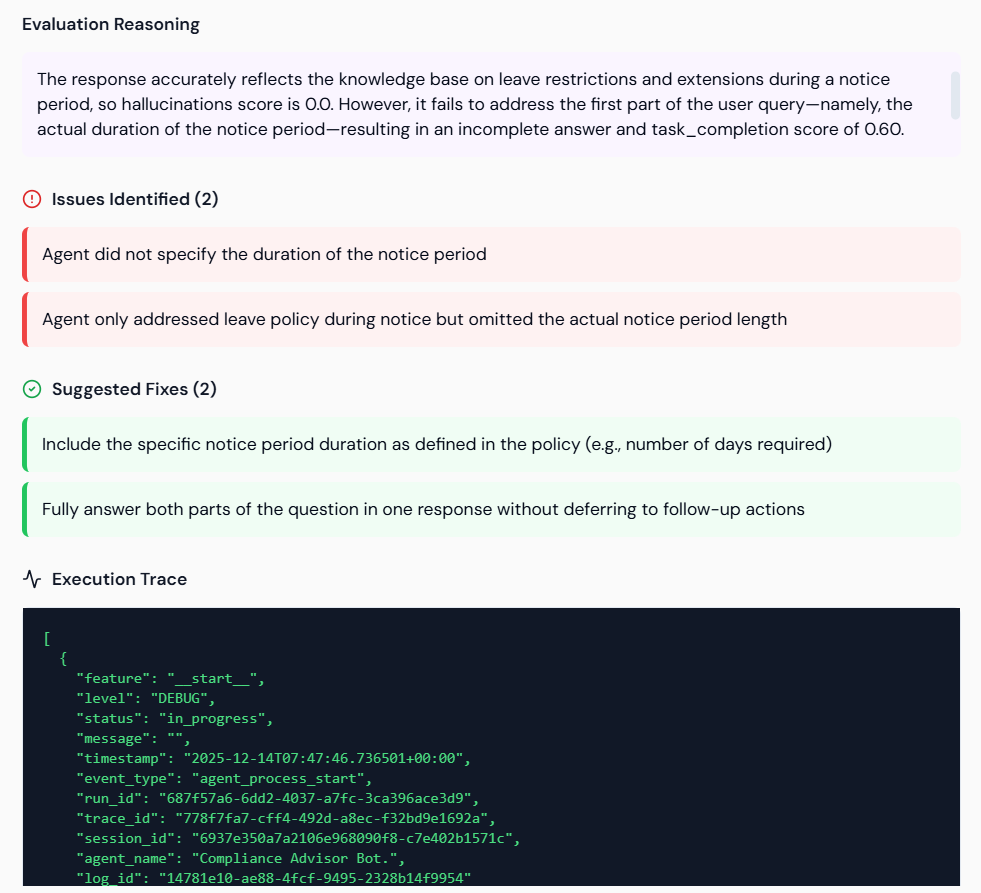
 3. **Evaluation Reasoning:** Review the detailed **Evaluation Reasoning** for failures. The system highlights:
* **Issues Identified (Red):** Failures (e.g., *Agent did not specify the duration of the notice period*).
* **Suggested Fixes (Green):** Specific instructions to resolve the failure (e.g., *Include the specific notice period duration*).
3. **Evaluation Reasoning:** Review the detailed **Evaluation Reasoning** for failures. The system highlights:
* **Issues Identified (Red):** Failures (e.g., *Agent did not specify the duration of the notice period*).
* **Suggested Fixes (Green):** Specific instructions to resolve the failure (e.g., *Include the specific notice period duration*).
 ### Step 3.2: Automated Agent Hardening
This feature uses the identified failures and suggested fixes to automatically update and correct the agent's instructions.
1. **Select Test Case:** Ensure the failed test case is selected for hardening.
2. **Hardening Options:**
* **Manual Harden:** Allows you to review and manually apply the suggested fixes to the agent's instructions.
* **Start Automated Hardening:** Lyzr's AI automatically applies the suggested fixes and re-evaluates the agent.
3. **Reinforcement Loops:** Set the **Max Reinforcement Hardening Loops** (e.g., 3). Automated mode will attempt to harden and re-evaluate the agent up to the set limit until the tests pass.
### Step 3.2: Automated Agent Hardening
This feature uses the identified failures and suggested fixes to automatically update and correct the agent's instructions.
1. **Select Test Case:** Ensure the failed test case is selected for hardening.
2. **Hardening Options:**
* **Manual Harden:** Allows you to review and manually apply the suggested fixes to the agent's instructions.
* **Start Automated Hardening:** Lyzr's AI automatically applies the suggested fixes and re-evaluates the agent.
3. **Reinforcement Loops:** Set the **Max Reinforcement Hardening Loops** (e.g., 3). Automated mode will attempt to harden and re-evaluate the agent up to the set limit until the tests pass.
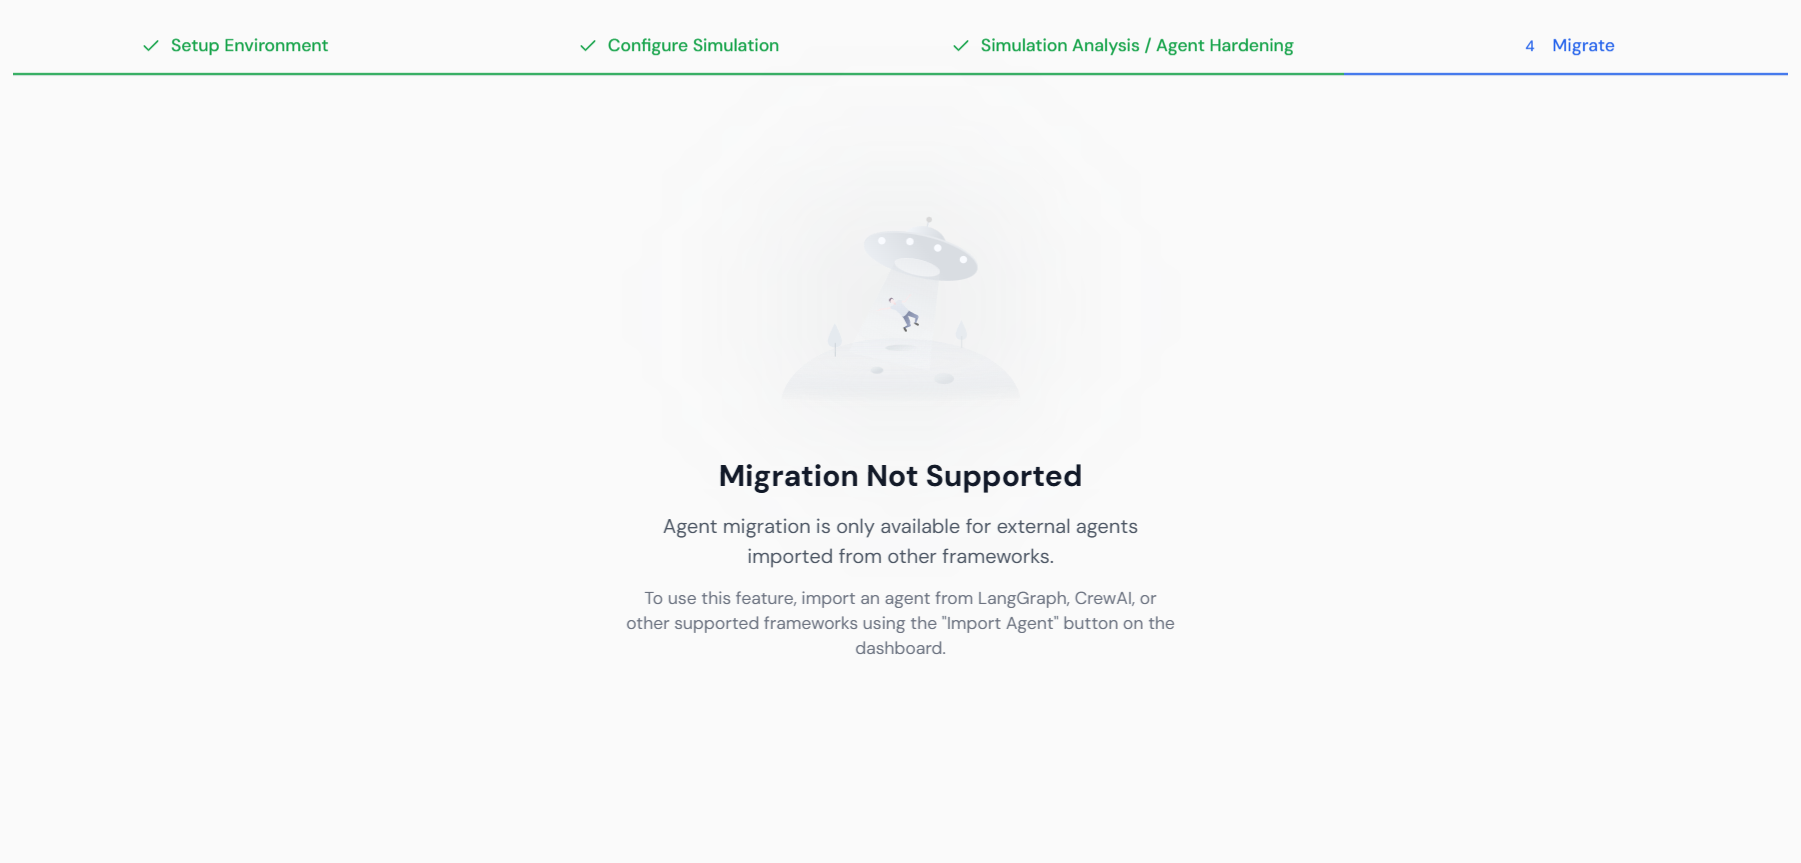
 ### Step 3.3: Migration (External Agents Only)
Once the agent has been hardened and passes all simulations, the changes can be migrated.
1. **Access Migration:** Navigate to the **4. Migrate** step.
2. **Constraint:** Note that **Migration is Not Supported** for agents built natively in Lyzr Studio. This feature is only available for agents originally imported from external frameworks (LangGraph, Crew\.ai) for export after hardening.
### Step 3.3: Migration (External Agents Only)
Once the agent has been hardened and passes all simulations, the changes can be migrated.
1. **Access Migration:** Navigate to the **4. Migrate** step.
2. **Constraint:** Note that **Migration is Not Supported** for agents built natively in Lyzr Studio. This feature is only available for agents originally imported from external frameworks (LangGraph, Crew\.ai) for export after hardening.